Email us
hello@tile.co.uk
hello@tile.co.uk
Cracked floor tiles can create a less-than-ideal appearance in any home, not to mention the potential safety hazards. But what if we told you that understanding the “5 reasons your floor tiles are cracking and how to prevent it” could save you from such dilemmas? Here, we’ll delve into the world of floor tiles and uncover the top reasons behind those pesky cracks, along with viable solutions to ensure your tiles remain in top-notch condition.
We've got you covered, from installation techniques to choosing the right tiles and proper maintenance. Get ready to become a tile-cracking-solving connoisseur and enjoy beautiful, crack-free flooring for years to come.
It's quite common for floor tiles to crack. The five main reasons that could cause cracking include poor installation, heavy loads, impact damage, environmental factors and moisture. Read on to discover more and find out just how you can remedy cracked tiles in your home.
It's vital to choose tiles based on durability and resistance to water or outdoor/indoor use. Proper installation techniques can also help prevent cracking. Regular cleanings and inspections plus DIY repairs for minor cracks, will keep your tiles in top condition. What's more, you can always call a professional for more severe damage.
Tiles aren’t invincible, and various factors can lead to floor tiles cracking. Some of the most common causes of tile cracks include:
Understanding these causes can help you prevent tile cracks and maintain a flawless, damage-free surface.
One of the primary reasons for tile cracking is poor installation techniques. Common mistakes include:
These errors can lead to an unstable surface, causing the entire tile to crack.
Gaining a grasp of the correct installation techniques is a key step in preventing tile cracking. Using a crack isolation membrane or stretchable screed, for example, can help prevent hairline cracks in the surface, fractured tiles, strain transfer and cracking, and movement-related cracks. Ensuring that the subfloor is prepared correctly and using the right materials will go a long way in maintaining the durability of your tiles.
Another common cause of tile cracking is heavy loads and impact damage. Heavy furniture, appliances, or even falling objects can stress your tiles excessively, resulting in cracks. Even wall tiles can suffer due to the weight of heavy items hanging on them.
Preventing tile damage from heavy loads and impact requires some caution. Here are some tips to keep in mind:
Environmental factors, such as temperature fluctuations and moisture, can also contribute to tile cracking. Tiles can expand and contract with changes in temperature, putting stress on the material and causing cracks. Moisture can weaken tiles and cause swelling, further increasing the risk of cracks.
Mitigating environmental factors involves maintaining consistent temperature and humidity levels in your home. Choosing tiles that are resistant to moisture and temperature changes will help ensure their longevity and reduce the risk of cracking.
The prevention of tile cracking significantly depends on the selection of appropriate tiles for your space. Factors to consider include durability, moisture resistance, and whether the tiles are intended for indoor or outdoor use. High-quality tiles that can withstand heavy loads and regular use are more likely to remain crack-free.
We will further delve into popular tile choices like ceramic and porcelain and outline the variances between indoor and outdoor tiles. Armed with this knowledge, you’ll be able to make informed decisions when choosing the perfect tiles for your space.
Ceramic and porcelain tiles are popular choices for their durability and versatility, making them perfect for creating stunning tiled floors. Both of these tile types are denser and harder than other materials, allowing them to resist water and wear effectively. In addition, their durability enables them to withstand heavy foot traffic, making them ideal for busy areas.
It’s crucial to align your choice of ceramic or porcelain tiles with your specific needs. Ceramic tiles and mosaic tiles offer affordability, durability, and easy maintenance, while porcelain tiles provide water resistance, fire resistance, and low maintenance. By selecting the right tile type, you’ll ensure a long-lasting, crack-free surface.
You must take into account whether the tiles are designed for indoor or outdoor use when making your selection. Indoor tiles should be moisture-resistant and durable, while outdoor tiles need to withstand weather conditions and temperature changes.
Natural stone tiles, like slate, granite, travertine or marble, are popular options for outdoor floor tiles. Concrete tiles are also commonly used. For indoor tiles, ceramic and porcelain are common choices due to their durability and versatility. By selecting the appropriate multiple tiles for your specific environment, you’ll minimise the risk of cracking and ensure a beautiful, long-lasting surface.
Proper installation techniques play a significant role in preventing tile cracking when installing floor tiles. Here are some steps to follow:
By mastering these methods, you’ll be well on your way to a crack-free, visually appealing tiled surface.
Successful tile installation hinges on a properly prepared subfloor. Proper subfloor preparation ensures a level surface and prevents future cracks. Steps involved in subfloor preparation include:
By taking the time to thoroughly prepare your concrete substrate, you’ll create a stable foundation for your tiles. This will reduce the risk of tile cracking and ensure a flawless, long-lasting surface.
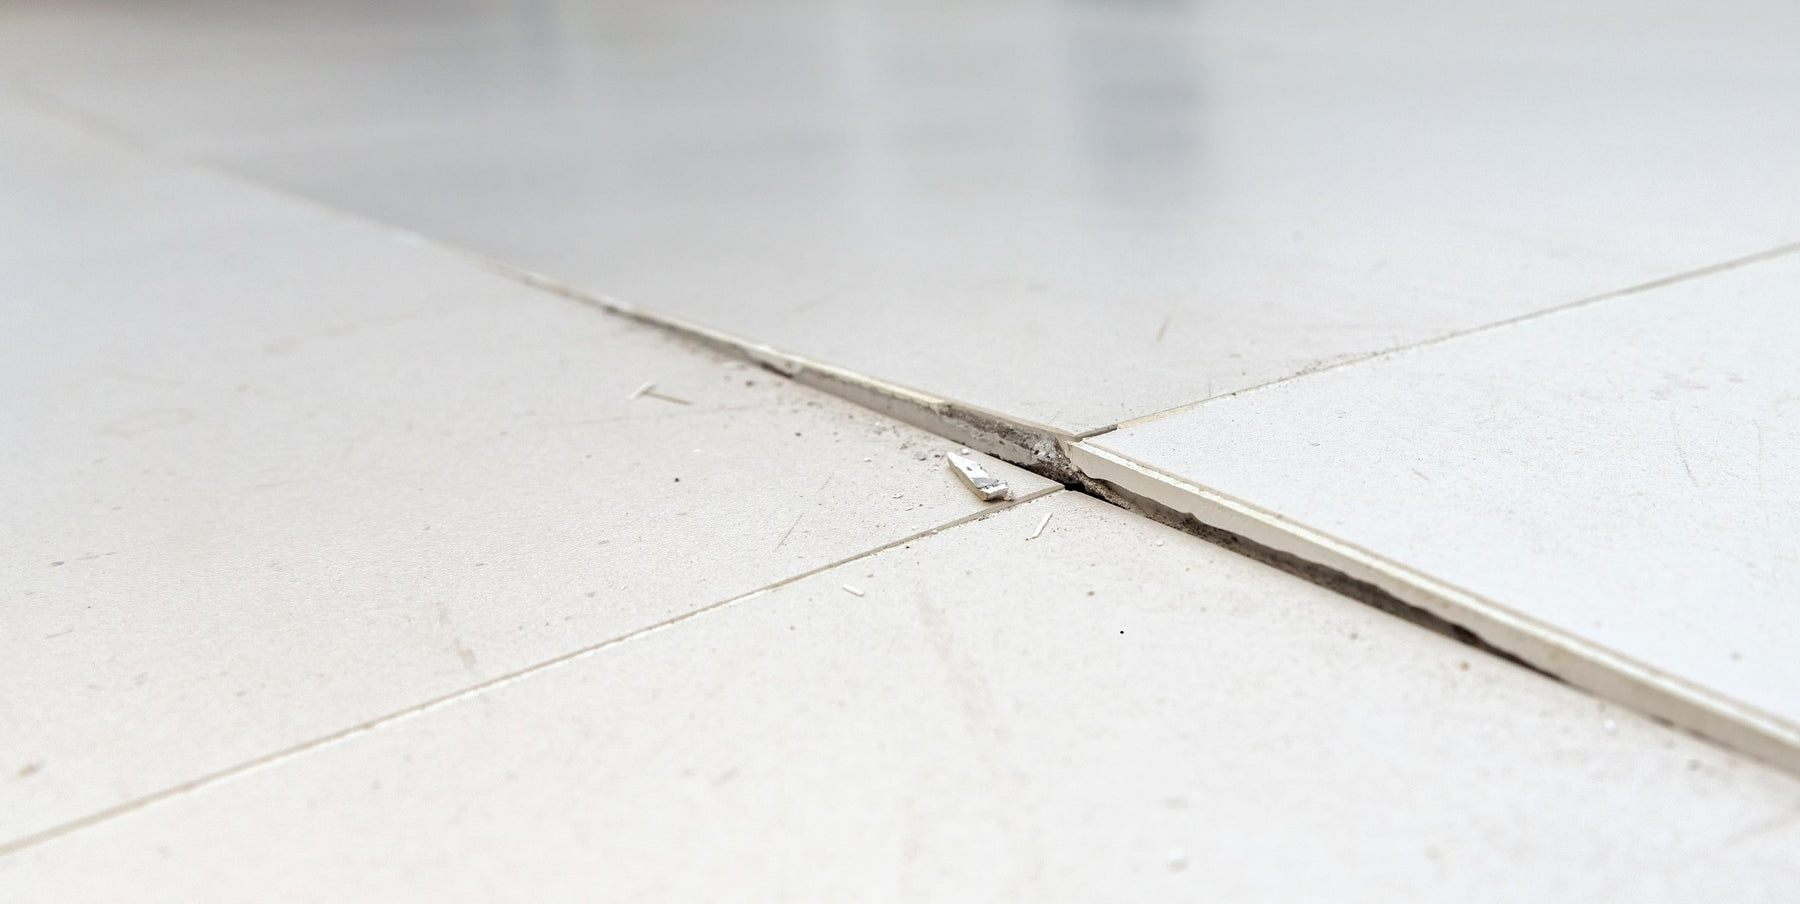
The role of expansion joints and control joints in tile installation is pivotal, given they facilitate natural movement in building materials, thereby averting structural damage and tile cracking. These joints create gaps or spaces between tiles to accommodate expansion and contraction due to temperature changes and other factors.
To install expansion joints correctly, they should be placed at least 6 metres apart for heated floors and 8 metres apart for unheated floors, following the manufacturer’s guidelines for the right profile size. Properly installed expansion joints will minimise the risk of tile cracking and ensure a durable, stable surface.
For achieving strong bonding and durability, which reduces the risk of tile cracking, the importance of using the right adhesive and mixing it correctly cannot be overstated. Deformable adhesives, such as S1 or S2 adhesives, and flexible tile adhesives are your best bet for preventing cracks.
To apply the adhesive, follow these steps:
Maintaining your tiles regularly is fundamental to keeping them in optimal condition and answers the question, "How to prevent future cracking?". By adopting the proper cleaning methods and conducting regular inspections, you’ll ensure the longevity and beauty of your tiled surfaces.
Utilising mild, ammonia-free detergents for cleaning is crucial for maintaining the pristine appearance of your tiles. Harsh chemical cleaners can damage the surface of your tiles, leading to potential cracks or other issues.
Carrying out frequent inspections of your tiles is fundamental in detecting and tackling potential issues before they worsen. By promptly spotting and fixing minor cracks, you can prevent further damage and maintain your tiles’ overall appearance and quality.
During your inspections, look for signs of damage or wear, such as:
By staying vigilant and addressing any issues promptly, you’ll keep your tiles in top condition and minimise the risk of cracking.
For minor cracks, DIY solutions can be a viable option for repairing a cracked tile, while professional intervention may be necessary for more severe damage to cracked tiles. While some minor cracks can be easily fixed with clear epoxy or cement-based filler, larger cracks or damaged tiles may require professional intervention.
By understanding the appropriate course of action for various types of tile damage, you’ll ensure the longevity and beauty of your tiled surfaces. Here's how:
You can resort to clear epoxy or cement-based fillers for minor cracked tile repair. Before applying the repair material, ensure the surface is clean and dry to achieve the best results.
To use cement-based filler for minor tile repair, follow these steps:
In cases of larger cracks or damaged tiles, tile replacement might be the necessary course of action. Replacing a damaged tile typically involves clearing the area, cutting the grout, removing the old tile, cleaning the old adhesive, applying new adhesive, installing the new tile, letting the adhesive dry, adding grout, and cleaning the area.
In some cases, seeking professional help for tile replacement may be more cost-effective than a DIY approach. Professional tile installers have the skills and expertise to ensure the job is done right the first time, saving you money in the long run. For example, if your floor contains a large number of broken tiles, the most effective solution could well be an entire tile floor replacement.
There you have it! Understanding the common causes of tile cracking, such as poor installation, heavy loads, impact damage, and environmental factors, is essential in preventing and addressing tile damage. By choosing the right tiles for your space, adopting proper installation techniques, and maintaining your tiles with regular cleaning and inspections, you’ll ensure a beautiful, crack-free surface for years to come.
Take the initiative from our comprehensive guide to learn from this information and apply it to your tile installations and maintenance routines to maintain the beauty and integrity of your tiled surfaces, creating a flawless, inviting space in your home.
Browse our entire website to discover more about caring for your tiles or get in touch for more information.
{"one"=>"Select 2 or 3 items to compare", "other"=>"{{ count }} of 3 items selected"}